Showing posts with label Colour Blast Gesso. Show all posts

Monday, 18 February 2019

Scrap the Boys - February Challenge - "My Foodie"

Hi Scrap Friends

Today I'm sharing a February project for
Scrap the Boys

"My Foodie"


This month we were to be inspired by this moodboard

February 2019 Challenge

I also used the bonus cut file from


Recently my focus has been on multi photo layouts.
So I raided my printed photo stash and realised I had quite a few of Master C enjoying food!
So I combined them and I love how this one turned out!

I've used Colour Blast sprays on the cut file and mounted it with foam to add dimension.
Then I chose a patterned paper background but muted it with some heavy white gesso to help lift the cut file and the photos from the background.

Thanks for visiting.


Tuesday, 17 July 2018

--- Colour Blast DT --- "Awesome" Scrapbook Layout + process video

Hi Scrap Friends

Today I'm sharing a new project for Colour Blast

"Awesome"


For this page I've used the following

Colour Spray Rainforest
Colour Shimmer Spray Apple of my eye
Colour Paste Just Blue

***

Firstly I've started with the Cocoa Vanilla Studio "Boys Rule" collection.
What a great Aussie company and teamed with Colour Blast = perfection!
Using a spatula, I'm just adding some Colour Paste Just Blue and allowing it to dry naturally.


While it's drying, I've cut a circle with my Cameo and then sprayed it with Colour Spray Rainforest and Colour Shimmer Spray Apple of my eye.
The two together create a lovely green shimmer!
I've dried this with the heat gun and I love the way the circle has kind of warped and has such a textured feel to it - I decided to leave it this way on the page.


I next went on and did some paper layering and fussy cut the title.


The background still needed something to help it POP!
So I went to my go to product - Black heavy gesso.


Once everything is dry, I've added the rest of the layers and some stickers.


Black gesso over colour paste gives a gorgeous effect and I can't wait to try this with the "Sunshine" paste.


The green sparkly textured circle is one of my favourite parts of the page and I'm looking forward to doing this again in the future.


You can see the whole process in the video below.


Thanks for visiting.
Happy Scrapping


Tuesday, 3 July 2018

--- Colour Blast DT --- "Watch me Grow" Scrapbook Layout + process video

Hi Scrap Friends

Today I'm sharing a new project for Colour Blast

"Watch me Grow"


For this page I've used the following

Colour Artist Inks Calypso
Colour Artist Inks Mermaid
Colour Artist Inks Soot

***

Firstly I've used a stencil and smoothed some White heavy gesso through it.
I focused on two different areas - the left side and right side and wanted a triangle kind of effect.


I left it to dry naturally overnight - a heat gun works also.
Once it's completely dry, I've dripped some Colour Artist Inks Mermaid and used water to help it move into the gaps  - some I want to soak into the paper and some will sit on the gesso.


Repeat the process with Colour Artist Inks Calypso.


Finally I added a very small amount of Colour Artist Inks Soot and again added some water to help it move.


I love how this background looks! The inks move so nicely around the gesso and are almost like watercolour. 


It's at this point that I wonder what to do next.
I'm looking at the layout thinking about the shapes I've used - hexagons, triangle (square/rectangle photo) - I'm only missing circles.
So I grab some empty toilet rolls and dip them in Black Heavy Gesso


With the little bit of left over Black Heavy Gesso I add some water and using a paint brush, add a couple of splatters around the page.


Finally I've added my photo - with paper cluster and title.
I struggled choosing a title and a position, but in the end, I love how the title suits the photo and has a lovely pop of contrast on the page.


***

You can see the whole process in the video below.


Thanks for visiting.
Happy Scrapping


Wednesday, 6 June 2018

--- A2Z Scraplets DT --- "Adorable" Scrapbook Layout

Hi Scrap Friends

Today I'm sharing a layout for A2Z Scraplets

My layout "Adorable"


This month over in the A2Z Scraplets papercraft challenge facebook group you'll find a fun moodboard to play along with.

No automatic alt text available.

The explosion of colour was my inspiration. So I took a a neutral paper collection (Kaisercraft Pen & Ink) and added some colour.
We'd also like you to scrap a celebration.


You can find this "Adorable" word in the A2Z Scraplets shop.
I've firstly coated it with white gesso, then coloured with Distress Ink.
Finally I've given it a coat of Colour Blast embossing powder "Snow White"


In the background layers, you'll also find the Jenny Frame, which I've covered with black gesso.

The mixed media background features texture paste, Colour Blast Shimmer dust and black gesso.


Thanks for visiting.
Happy Scrapping. 

Tuesday, 22 May 2018

--- Colour Blast DT --- "Cone of Shame" Scrapbook layout + process video

Hi Scrap Friends

Today I'm sharing a new project for Colour Blast

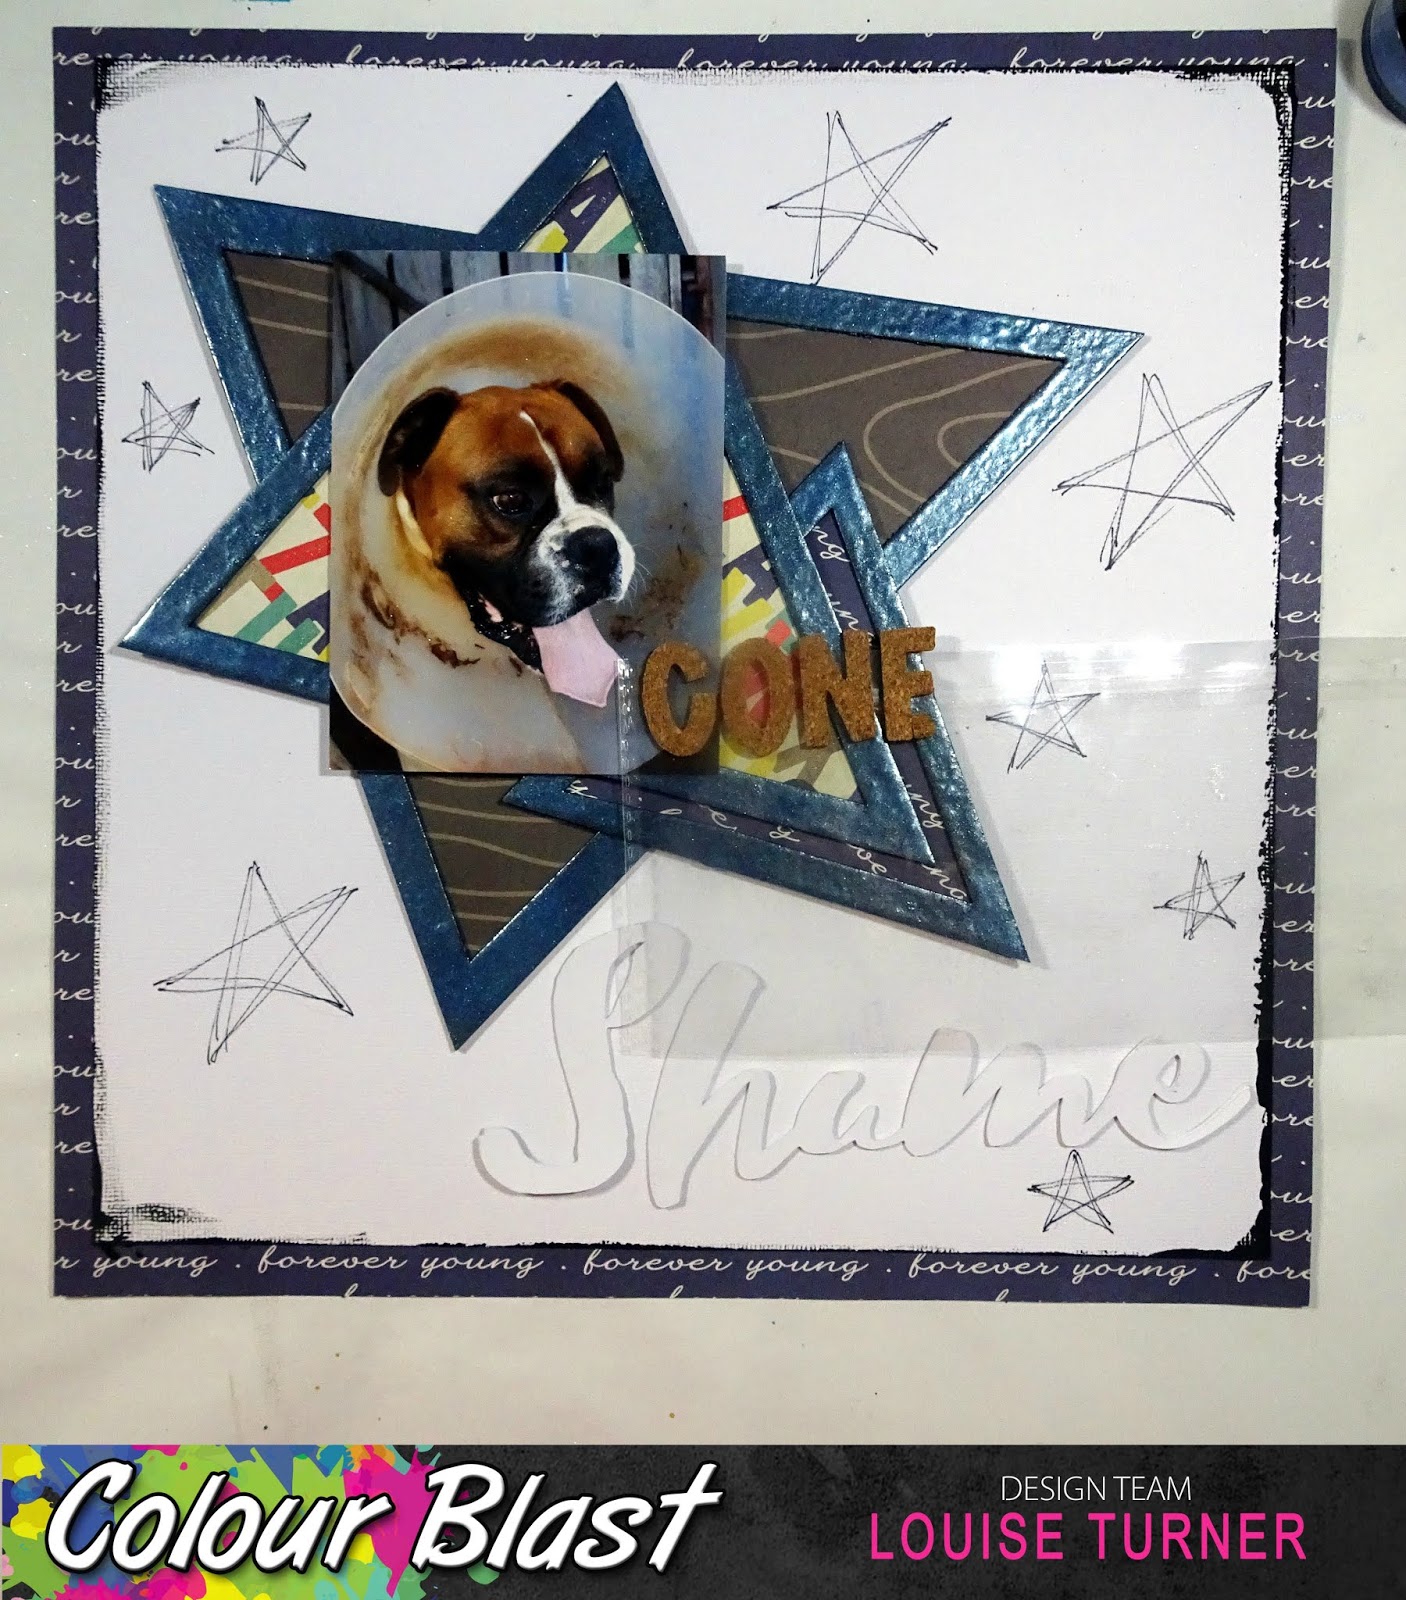
"Cone of Shame"


For this page I've used the following

Colour Embossing Powder Deep Water & Singin the Blues
Colour Paste Steel
Colour Artist Inks Calypso

***

I started firstly with this photo that's been in my stash for awhile and I never really got the courage to scrap it.
Today was the day ...

I chose some chipboard pieces and teamed them with Colour Embossing Powder Deep Water & Singin the Blues


Next, I put together a background.
I didn't plan to back the triangles with patterned paper but that's how it ended up.


But it's all looking a little clean ...
Black heavy gesso to the rescue!
I created a messy border around the outside of the white cardstock.


I have a bit of a star theme going on, so I decided to roll with it and hand draw some stars on my bckground.


Then I painted the stars with Colour Artist Inks Calypso - I like them to be a little messy and outside the lines.


I've used my Silhouette to create the word "Shame".
I wanted to use the colour paste in a slightly different way and see what hapenned.

So I spread some on my craft mat, added a little water and then used a paint brush to add the paste to the title.


You can see it's created this really cool textured finish - the photo doesn't do it justice.
You should definitely give this a go, it's such a cool result.

***

Here is the layout "The cone of Shame"


and some close ups ...


I'm so pleased with the result - it definitely highlights the photo and I love how the title tells a great story.


 ***

You can see the whole process in the video below.


Thanks for visiting.
Happy Scrapping


Sunday, 13 May 2018

Scrap the Boys - May Challenge "Sweet" Scrapbook layout

Hi Scrap Friends

Today I'm sharing a challenge entry for May.
My schedule means that I don't get to play along with challenges very often but this month I'm making time!!!

My layout for the challenge at Scrap the boys.

"Sweet"


This moodboard has such a great "Boy" feel to it.


My inspiration came from the combination of blue and green colours + the leaves.
I chose an outdoors photo of Master Z that also includes the inspiration colours.


My background is a stripey paper - also moodboard inspired.
I've covered it with some White Heavy Gesso and then used Colour Blast Shimmer Dusts in "Navy" and "Cobalt" to create the colour.


Finally, I've added some paper layering and title + a few small embellishments.


Thanks for visiting.
Happy Scrapping.


Tuesday, 8 May 2018

--- Colour Blast DT --- "Really" Scrapbook Layout + process video

Hi Scrap Friends

Today I'm sharing a new project for Colour Blast

"Really"


For this page I've used the following

Colour Spray Carribean
Colour Shimmer Spray Envy

***

Firstly, at the end of this blog post you will find a video link - I'd encourage you to watch it so that you can see how I achieved this reverse cut file.

I'll try and explain it, but it's much easier to watch ...

After you have cut out your cut file - leave the remaining pieces on the sticky mat.
Add glue to the left over cut file pieces and then place a piece of 12x12 paper/cardstock over the glue.
Allow to dry overnight and then peel all the pieces off the mat.
You are left with the reverse cut file - so cool!
  

I've given my page a coat of clear gesso.
Then in each square I'm going to use a paint brush to add Colour Spray Carribean, Colour Shimmer Spray Envy and Colour Shimmer Cube Deep Water.
Using my stamp block, I then pressed the colour to smudge it around.


Add as much or as little colour as you desire.


I allow my colour to dry naturally overnight - but a heat gun works also.
Once dry, I used black pen to draw around the cut file.


I felt like the background still need a little something, so I added some Black Heavy Gesso through a stencil using a sponge.


Finally, I chose some papers, stickers and elements to enhance my photos.


I just love how you can really see the layers in the page:
paper, mixed media, paper, photo.
***

You can see the whole process in the video below.


Thanks for visiting.
Happy Scrapping